OAuth2 and OpenID Connect are protocols for allowing Third Party Applications to request authorisation to a user’s private details on another site without the external application ever getting the user’s password. This is done by obtaining an authentication token, and sending the token with all resource requests. This method of authorisation is preferred over Basic Authentication because it is possible to limit what data any given token can access, and the token can be revoked by the user at any time.
Terminology
“Third Party Application” AKA “Client” or “Relying Party”
This is the app attempting to obtain access to the details of the User’s Account. Permission is required from the user in order to obtain access.
“The API” AKA “Resource Server” or “Identity Provider”
This is server(s) hosting the resources that are protected i.e. the system having access to the User’s data.
“The User” AKA “Resource Owner”
This is the person authorising a third party application to access their account details.
Obtaining an access token in a Server Application
In order to use the oAuth service the appID you use needs to be associated to a secret key. To get your secret key please contact us at developer@justgiving.com with details of your appID and we will go about creating you one.
Web Server apps are written in a server side language (c#, java, php, ruby) and executed on the server where the source code resides. The source code is not visible to the public. Developer SDKs are available at:
https://github.com/JustGiving/JustGiving.Api.Sdk2. More generic examples including other languages can be found at
https://github.com/IdentityServer/IdentityServer3.Samples
The “Authorisation flow” for a Server-Side application
-
The Third Party Application redirects the user to a login URL on the Resource Server. The Third Party Application must generate the full URL, details of the construction are later in this document. This redirect can be either in a pop-up or the same browser window.
-
An example URL looks like this:
https://identity.justgiving.com/connect/authorize?client_id={clientId}&response_type=code&scope=openid+profile+email+account+fundraise&redirect_uri=http%3A%2F%2Fwww.thirdparty.com%2Fauth.php&nonce=ba3c9a58dff94a86aa633e71e6afc4e3
- client_id is the “Application Id” from your JustGiving Developer Portal account.
- scope is a space delimited list of the data the Third Party would like to read. The minimal scopes you must request are “openid” and “profile”. OAuth authorisation cannot continue without these. Other possible scopes are
- fundraise: Create, modify and view fundraising pages and team pages on your behalf
- account: Create, modify and view your JustGiving user account
- social: View information about people you know (coming soon)
- crowdfunding: View information about crowdfunding pages (coming soon)
- redirect_uri must match the “Home page for your application” property in 3scale app details exactly, as this is used for authentication.
- state: You can use state to allow your application to pick up where it left off, before the redirect to The Resource Server
- nonce: This is a one off randomly generated value to prevent the request from getting modified. A GUID is best as it ensures uniqueness.
-
The user sees the following - The first screen asks them to login to JustGiving:
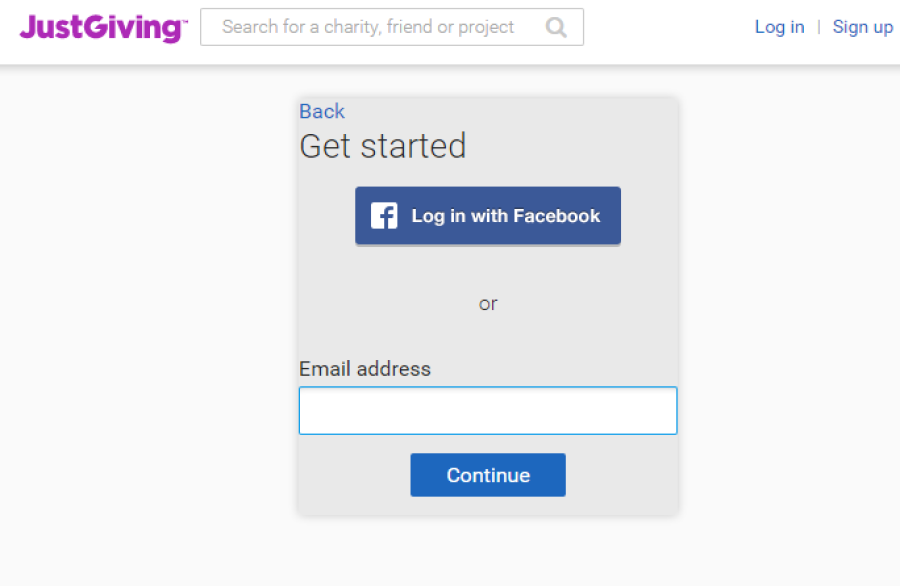
-
After logging in, the next screen asks for their consent:
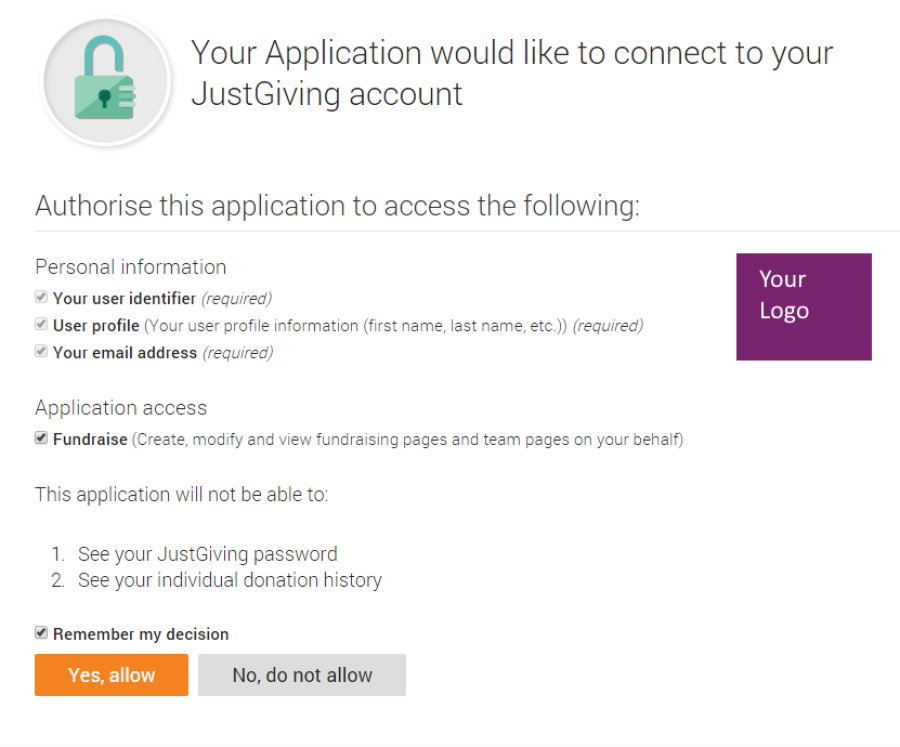
-
The user chooses to authorise the 3rd Party Application
- The browser is redirected back to the Third Party Application using the location specified by the “redirect_uri” query parameter in the request from the Third Party Application. The response from the Resource Server will contain a querystring parameter named “code”, the value of this will be used in the next request which is to generate an access token.
-
The Third Party Application requests a token from the Resource Server by sending a request to https://identity.justgiving.com/connect/token including a Basic Authentication header, the value of which is a base64 encoded value of {applicationId}:{secretKey}.
-
Example response:
{"id_token":"eyJ0eXAiOiJKV1QiLclippedPC2R1s035w", "access_token":"a8dfad6cfe559ae0d6e37426b3e0d078", "expires_in":3600,"token_type":"Bearer"}
Refreshing your access token
- POST to /connect/token as follows (example cUrl request):
curl -X POST -H "Authorization: Basic Basic Base64({appId}:{secret})" -H "Content-Type: application/x-www-form-urlencoded" https://identity.justgiving.com/connect/token -d "refresh_token={refresh_token}" -d "grant_type=refresh_token" -d "redirect_uri={redirect_uri}"
- refresh_token is your refresh_token from the original authorization call to /connect/token when including the “offline_access” scope.
- An example response:
{"id_token":"eyJ0eXAxxxgAfm_2w", "access_token":"f110416c611f55befb7fcc9d113484ec", "expires_in":3600,"token_type":"Bearer", "refresh_token":"4ef125dedc4728b2cac194b4648ccbd0"}
- access_token is your new access_token to use in accessing resources.
- refresh_token is your new refresh_token to use when next wanting to refresh the access_token.
Further help
Further help and documentation is available at our
Developer Help Centre.